Integrating customisation to pre-defined pipelines
This notebook gives an example how to add a custom qpcr.Analyser to a pipeline so you can profit from the pipeline’s automation. There are two pipelines that support customisation of their core parameters: these are the Blueprint and ddCt pipelines. In this tutorial we will use the Blueprint pipeline, in the next tutorial you will encounter the ddCt pipeline.
Experimental background
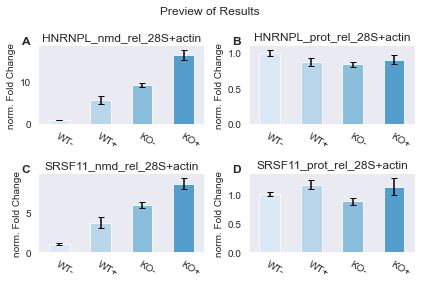
The corresponding experimental setup was as follows: Levels of Nonsense-mediated mRNA decay (NMD) sensitive (nmd) and insensitive (prot) transcript isoforms of HNRNPL and SRSF11 were measured by qPCR. As normalisers both 28S rRNA and Actin transcript levels were measured. The replicates are biological triplicates and technical douplicates. All measurements from the same qPCR sample were merged into hexaplicates (6 replicates). This was done in two separate HeLa cell lines (one with a specific gene knockout (KO), and one without (WT)), which were both treated to a plasmid-mediated rescue (+) or not (-), leading to four experimental conditions:
cell line \ condition |
rescue |
no rescue |
|---|---|---|
knockout |
KO+ |
KO- |
wildtype |
WT+ |
WT- |
First Analysis
In the last tutorial we have specified a custom anchor to our qpcr.Analyser. However, in the last tutorial we assembled our analysis workflow manually. We do have a nice set of pre-defined pipelines, however, in the qpcr.Pipes, so, wouldn’t it be nice if we could profit from their automation while still retaining our custom specs? Well, sure it would! That’s why we have the Blueprint pipeline, which sets up default settings for DataReader, Analyser, and Normaliser but
also allows you to overwrite these with your own ones. In truth, the BasicPlus pipeline does nothing else but calling the Blueprint pipeline with default settings.
[1]:
# import the Blueprint pipeline
import qpcr
from qpcr.Pipes import Blueprint
from qpcr.Plotters import PreviewResults
Step 1 - Getting the data
First we get the datafiles (or rather their filepaths). Here, we do this manually. Of course, any more automated process that yields a list of filepaths is also suitable.
[2]:
# get our datafiles
normaliser_files = [
                        "./Example Data/28S.csv",
                        "./Example Data/actin.csv"
                ]

sample_files = [
                    "./Example Data/HNRNPL_nmd.csv",
                    "./Example Data/HNRNPL_prot.csv",
                    "./Example Data/SRSF11_nmd.csv",
                    "./Example Data/SRSF11_prot.csv",
            ]

# define our experimental parameters
reps = 6
group_names = ["WT-", "WT+", "KO-", "KO+"]
Step 2 - Setting up the Pipeline
2.1 Setting up the Pipeline
We have already seen how to set up the BasicPlus pipeline in the second tutorial in 2_pipeline_tutorial.ipynb. Setting up the Blueprint pipeline works just the same.
[3]:
# setup the pipeline
pipeline = Blueprint()

pipeline.replicates(reps)
pipeline.names(group_names)

pipeline.add_assays(sample_files)
pipeline.add_normalisers(normaliser_files)
2.2 Setting up the custom qpcr.Analyser
Now comes the interesting part. By default the anchor = "first", but let’s say we do not want to rely on that, but instead want to use a "mean" anchor, just as we did in the last tutorial. We can simply set up a custom Analyser, specify the anchor("mean") and then link that Analyser to our pipeline.
[4]:
# setup the analyser and specify anchor
analyser = qpcr.Analyser()
analyser.anchor("mean")
[4]:
('mean', 0)
Now we can add our Analyser to the pipeline using:
[5]:
pipeline.Analyser( analyser )
[5]:
Analyser(anchor='mean', ref=0)
2.3 Adding a Preview
Because we like plots so much, we also add a PreviewResults…
[6]:
# setup preview
preview = PreviewResults( mode = "static" )
pipeline.add_plotters(preview)
Step 3 - Running everything
Now we are already all set up and ready to run.
[7]:
# and now run
pipeline.run()
3.1 Finishing up
At this point we are already done with this tutorial. Setting up a custom Analyser is no different from setting up a custom Normaliser or Reader, so you now know how to customise an automated pipeline.